
Forget Mongo Passwords: AWS IAM Atlas Authentication

Why
You don’t want to deal with passwords. They are hard to keep track of, they get everywhere and (without additional tools) they provide zero accountability.
This can cause serious problems if we’re talking about something like a database connection password.
For authentication inside of the AWS ecosystem we use AWS IAM. There, we can create custom roles with various permissions which we can then assign to users or AWS services. IAM is a robust, secure system with a ton of integrations, but most importantly for this blog post, it’s a system that that anybody using AWS must use already. Meaning, we won’t be adding any additional tools or complicating the maintenance of our system.
Now, Mongo Atlas relatively recently added an option to use IAM when authenticating to your database which is documented here, but I didn’t find a full guide on how (or why) to use only IAM connections in your whole organization.
Some problems you fix by ditching passwords completely:
-
Completely removes one vector of attack (if you aren’t network limiting your database connections, which you should but that’s a different post)
-
No need to rotate or reset passwords (in a case of a security breach, theft, layoff etc)
-
You don’t have to keep track of who has access to what, everything is visible and trackable in IAM dashboard
-
In the case of a security audit (ex ISO/IEC 27001) you have an immutable log of who had which permissions when and you are relying on already certified AWS system for its reliability
Now, you can create a solution that achieves all of this using maybe the Secrets Manager, some additional network rules with flow logs, MongoDB access logs etc. But in my opinion, the solution in this post will result in the fewest moving parts. Making it easier to maintain and it also can be more easily extended through numerous existing IAM integrations.
The following post will assume you have already created an AWS account as well as a MongoDB Atlas account with at least a single deployment or a cluster.
IAM Connection in Atlas
First, create a “MongoAccessRole” IAM role without any permissions in AWS IAM. This will be the our dedicated Mongo connection role. Allow the services you want to connect to the database to assume this role.
In this case I am trying to connect a server that’s deployed on an AWS Lambda and I want to allow the members of the IAM Group “DBAdmins” to connect (not recommended for production db).
So I edit the Trust Relationship of the Mongo role to allow the lambda’s execution role and users in general to assume it.
{
    "Version": "2012-10-17",
    "Statement": [
        {
            "Sid": "Statement1",
            "Effect": "Allow",
            "Principal": {
                "AWS": "arn:aws:iam::{your aws account id}:role/service-role/{Lambda execution role}"
            },
            "Action": "sts:AssumeRole"
        },
        {
            "Sid": "Statement2",
            "Effect": "Allow",
            "Principal": {
                "AWS": "arn:aws:iam::{your aws account id}:root"
            },
            "Action": "sts:AssumeRole"
        }
    ]
}
Then we create a Permission policy “AssumeMongoConnectionRole”
{
    "Version": "2012-10-17",
    "Statement": [
        {
            "Sid": "VisualEditor0",
            "Effect": "Allow",
            "Action": "sts:AssumeRole",
            "Resource": "arn:aws:iam::{your AWS acc number}:role/MongoConnectionRole"
        }
    ]
}
After the next step, this policy will allow users or services to connect to the mongo database. They just need to have this policy attached, either through a role or directly and to know how and which role to assume.
So we attach it to our “Lambda Execution Role” and to the user group DBAdmins and we deliver the name of the role together with other database connection parameters to the lambda execution environment and to our database admins.
Technically, we could have done this without the “Assume Role” action. In that case, we would just need to create a new Mongo Atlas database access user for every role or user we want to connect to the database. But this approach with role assumption lets us keep everything inside of AWS, meaning a new connected service or user can be onboarded without requiring critical access to the Mongo Atlas dashboard.
Settings in Mongo Atlas
Now let’s go to Mongo Atlas and create a new database access user on your Mongodb cluster:
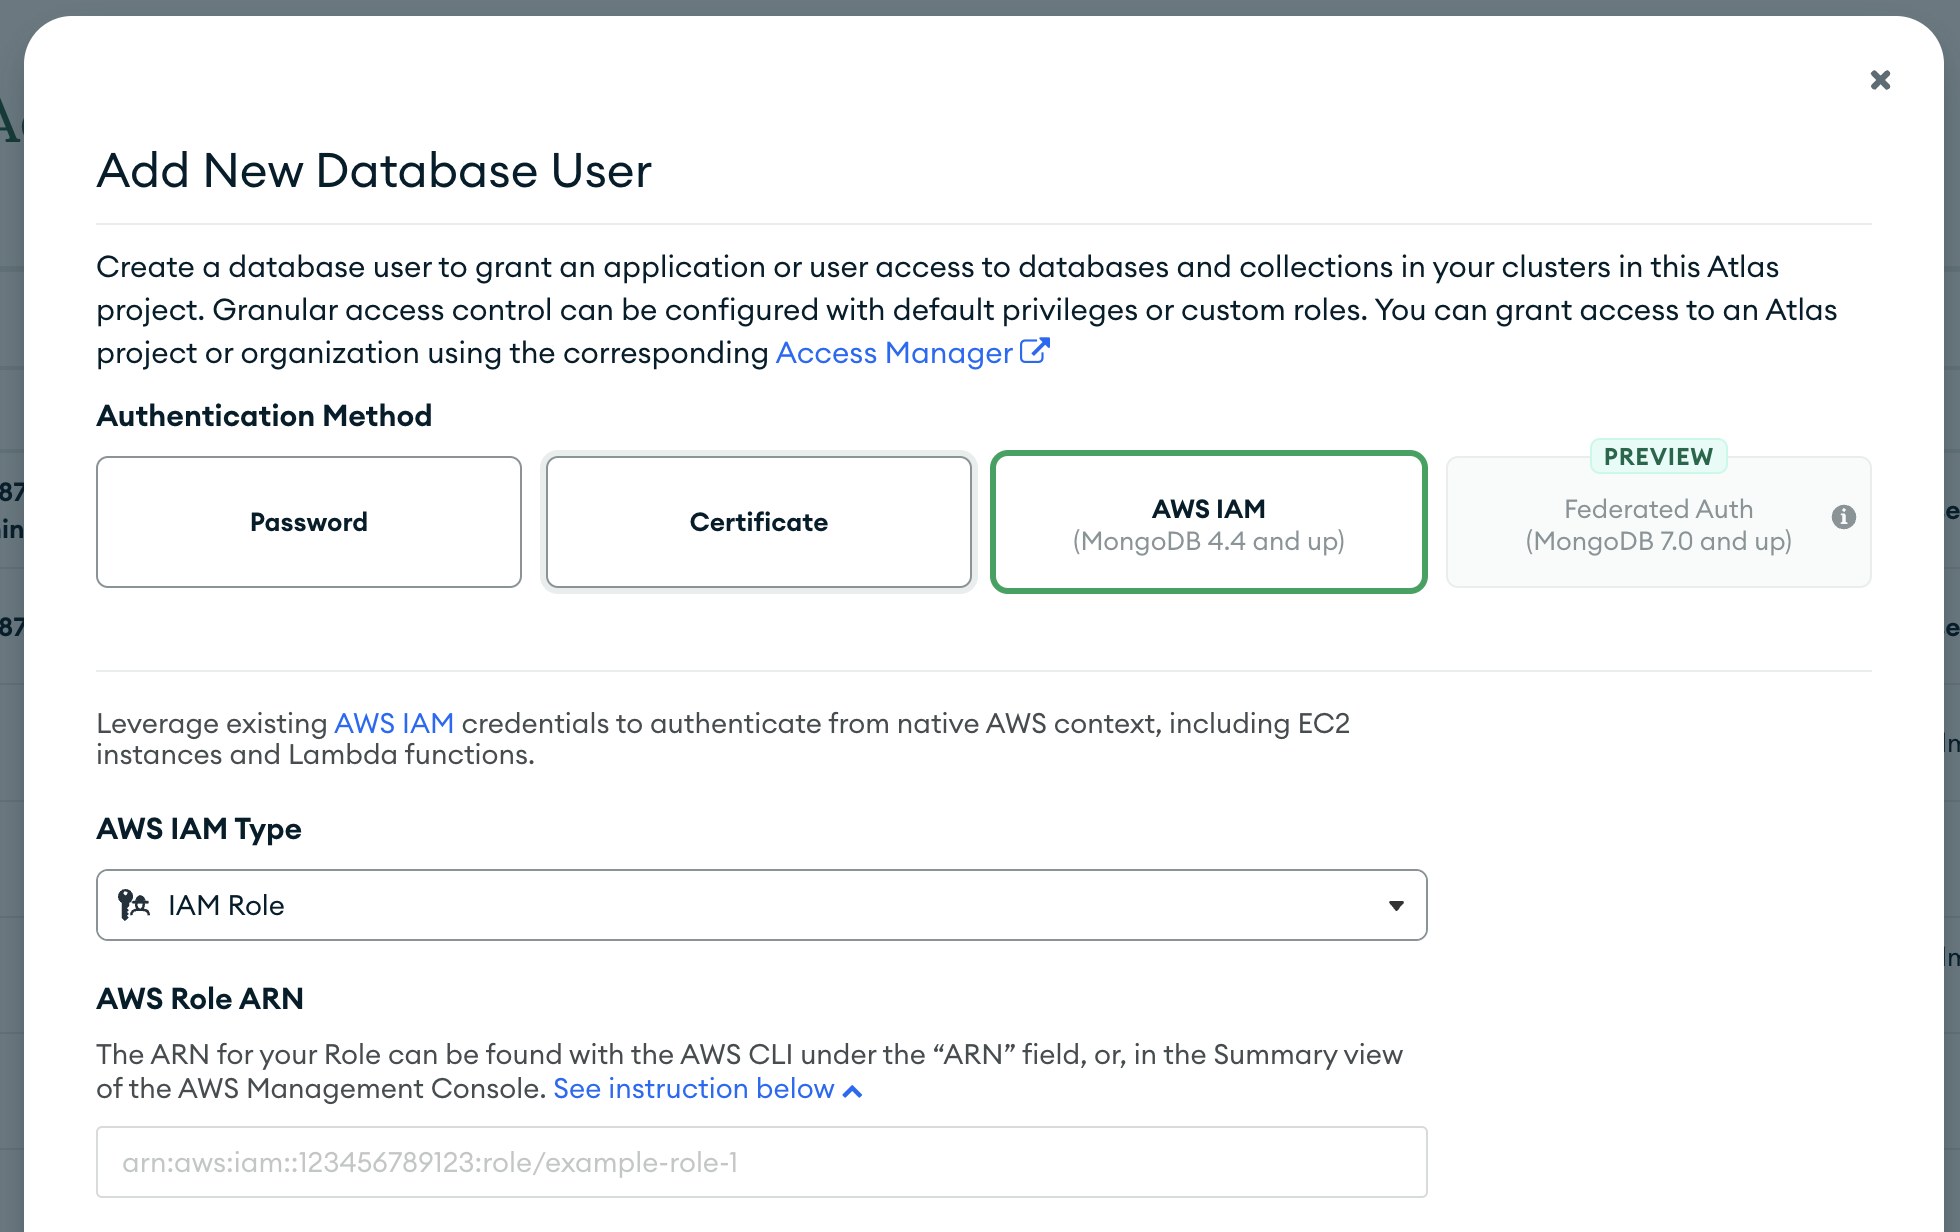
Pick AWS IAM as the auth method and IAM Role as IAM Type. Then copy the ARN of the MongoAccessRole role we created in the previous step.
Now or at any future point we can choose the needed database permissions for this role. The mongo permission system is extensive, together with the usual database read or write privileges it also offers the possibility of assigning granular permissions on the level of individual collections in the database. 1
Server Connection Example
On the server side we first assume the Mongo connection role, extract credentials from the returned object and create a new connection string using them like this: 2
Following code is in Typescript, but it is using the official AWS and Mongo client libraries, so the example in other languages should look similar.
    import { STS } from '@aws-sdk/client-sts';
    // ... //
    let role = await new AWS.STS({region: 'eu-west-1',}).assumeRole({
      RoleArn: process.env.MONGO_ROLE!,
      RoleSessionName: 'connection-server-' + Date.now(),
    });

    const dbURL = new URL(`mongodb+srv://${process.env.MONGO_HOST}/${process.env.MONGO_DB}`);
    dbURL.username = role?.Credentials?.AccessKeyId;
    dbURL.password = role?.Credentials?.SecretAccessKey;
    dbURL.searchParams.append('authSource', '$external');
    dbURL.searchParams.append('authMechanism', 'MONGODB-AWS');
    dbURL.searchParams.append('authMechanismProperties', `AWS_SESSION_TOKEN:${role?.Credentials?.SessionToken}`);
    process.env.MONGO_STR = dbURL.href;
    let dbClient = new MongoClient(process.env.MONGO_STR, {});
    await dbClient.connect();
    let DB = dbClient.db();
In this code snippet the environment variables MONGO_HOST, MONGO_DB and MONGO_ROLE are used respectively for the Mongo cluster domain, database name and the arn of the previously created “MongoAccessRole” role.
Compass Connection Example
If we are a developer in the DBAdmins IAM user group and we want to use Mongo Compass to connect to our database we would have to first get the credentials from the previous step and then manually enter them into the Compass connection fields.
Now this is troublesome and I fear that passwords would creep back in if we mandated something like that. So let us automate that part as well. We can take the credentials same as above, save them into a file in the proper format 3 and the start Compass from there.
    import { exec } from 'node:child_process';
    // ... //
    let temp = {
      type: 'Compass Connections',
      version: {
        $numberInt: '1',
      },
      connections: [
        {
          id: 'iam',
          connectionOptions: {
            connectionString: dbURL.href,
          },
        },
      ],
    };

    await writeFileSync('./mongo-connection.json', JSON.stringify(temp));
    exec('"/Applications/MongoDB Compass.app/Contents/MacOS/MongoDB Compass" --file=./mongo-connection.json iam');
The path to your Compass executable might vary
Monitoring
While we made sure that only the lambda role and database admins can assume the MongoConnectionRole we can also add some monitoring just to make sure.
We can use AWS CloudTrail for this, as it allows us to log all AssumeRole and similar events. Just create a new trail here and make sure you enable CloudWatch logs for better readability through the CloudWatch tools instead of reading raw files on S3.4
After creating the trail and several minutes of operation we can check and see if everything’s working using the CloudWatch Logs Insights.
Use the following query on the CloudWatch log group you created together with the trail. Just plug the full ARN of the role into the query:
fields @timestamp,
userIdentity.principalId' as identity, sourceIPAddress, userIdentity.sessionContext.sessionIssuer.arn' as role
| sort @timestamp desc
| filter requestParameters.roleArn = '{role ARN}' and userIdentity.type = 'AssumedRole'
You will get a table of all of the different identities which tried to assume the connection role together with their IP addresses:
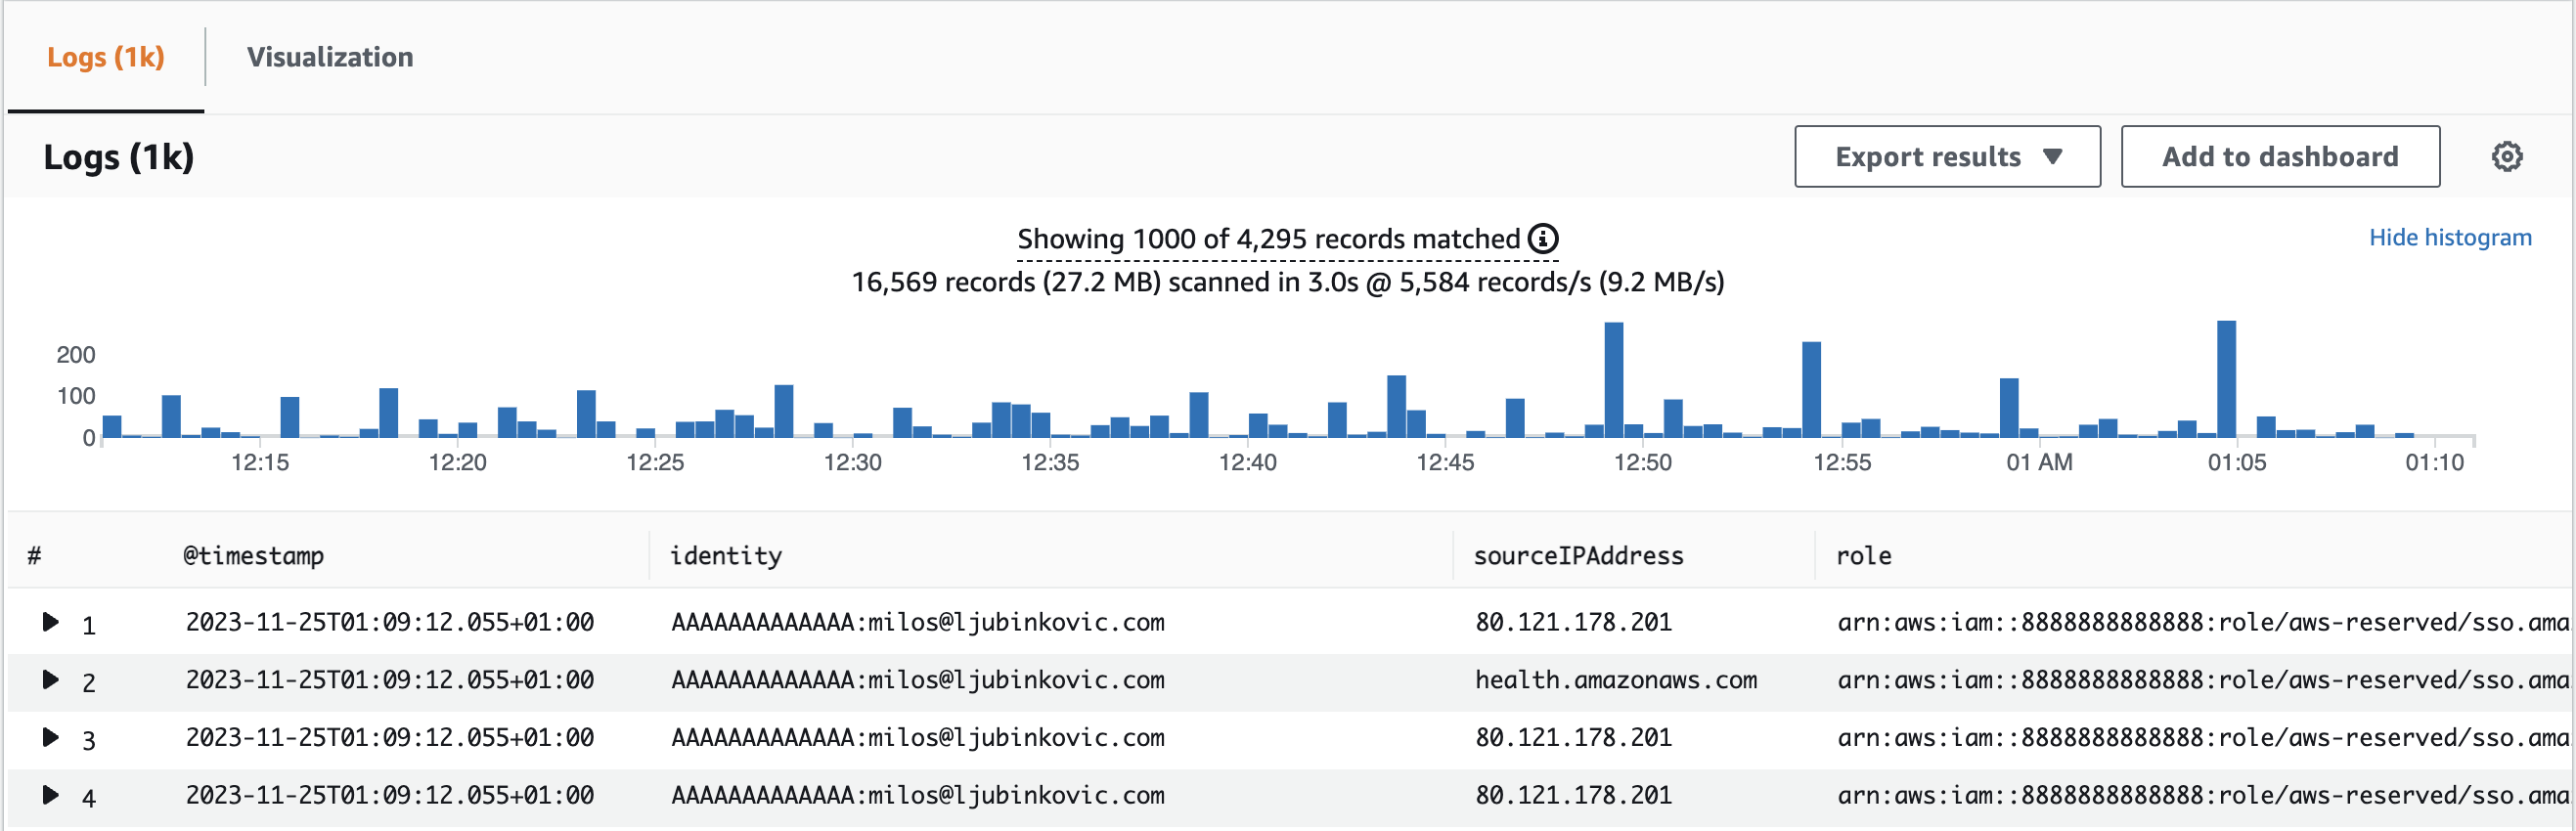
If necessary you can setup a CloudWatch alarm on this log group which will notify you if somehow someone else assumes the connection role or if a weird IP appears. Some general instructions on this can be found here
Links and Documentation
-
Mongo Atlas Manual, Collection-Level Access Control:https://www.mongodb.com/docs/manual/core/collection-level-access-control ↩
-
Mongo Atlas AWS Auth connection string: https://www.mongodb.com/docs/kafka-connector/current/security-and-authentication/mongodb-aws-auth/ ↩
-
Start Compass from the Command Line: https://www.mongodb.com/docs/compass/current/connect/connect-from-the-command-line/#configuration-file-connection-specification ↩
-
Cloudtrail User Guide: https://docs.aws.amazon.com/IAM/latest/UserGuide/cloudtrail-integration.html#cloudtrail-integration_examples-sts-api ↩