
Fullstack solution in a single Cloudformation template

In this post we’ll create a reliable and easily scalable full-stack solution on AWS with a safe and easy deploy procedure.
For hosting the backend server we’ll use AWS Lambda. This simplifies the deploy procedure by a lot and gives us a bunch of tools to use in the future in regards to monitoring and scaling.
Frontend will be hosted as a simple static site on S3
Both server and backend will be accessed from behind Cloudfront distributions. This allows us to later easily expand the stack with additional security and caching systems, as well as an easy way to put everything behind our own domain.
The final stack definition file with some extras can be found at https://github.com/milos-ljubinkovic/full-stack
Cloudformation
Instead of creating every resource in the stack one by one through the AWS console or cli, we’ll template files using AWS’s infrastructure-as-code solution Cloudformation. Defining all of the AWS resources in a single JSON or YAML template will make the resulting stack much easier to replicate and maintain than using custom scripts or other solutions. It also simplifies the deployment procedure, allowing us to monitor it step by step and rollback at any point of the deploy process if something goes wrong.
The Template Reference part of the Cloudformation documentation contains explanations for all fields and object types in the template that we will write. The short of it is that we will represent every AWS resource as an yaml object in a single file with some variables passed through during the deploy procedure. In the template file you will also see !Ref and !Join and similar built-in Cloudformation functions which is how we’ll connect the resources to each other and also how we pass deploy variables to the different resources.
You can recreate this stack multiple times in the same account or across different accounts. All components have unique names and all connections and resources are defined in the template. It’s a nice way to quickly create development environments on demand.
Quick Start
Prerequisites:
- AWS and Github accounts
- Own a domain with a hosted zone on AWS Route53
To deploy your own version of the stack just
-
Fork the repo at https://github.com/milos-ljubinkovic/full-stack
-
Create a new “prod” build environment
- Add the following variables to the github environment:
DOMAIN: the base domain name you own and will use for this website/apiAWS_ACCOUNT: your aws account idSTACK_NAME: desired name for this stack, using the same as an existing one will overwrite it
- Set up the authentication between github and AWS however you want. For example through OpenID or by just copying the access key and secret from IAM to the environment secrets in github settings->environments
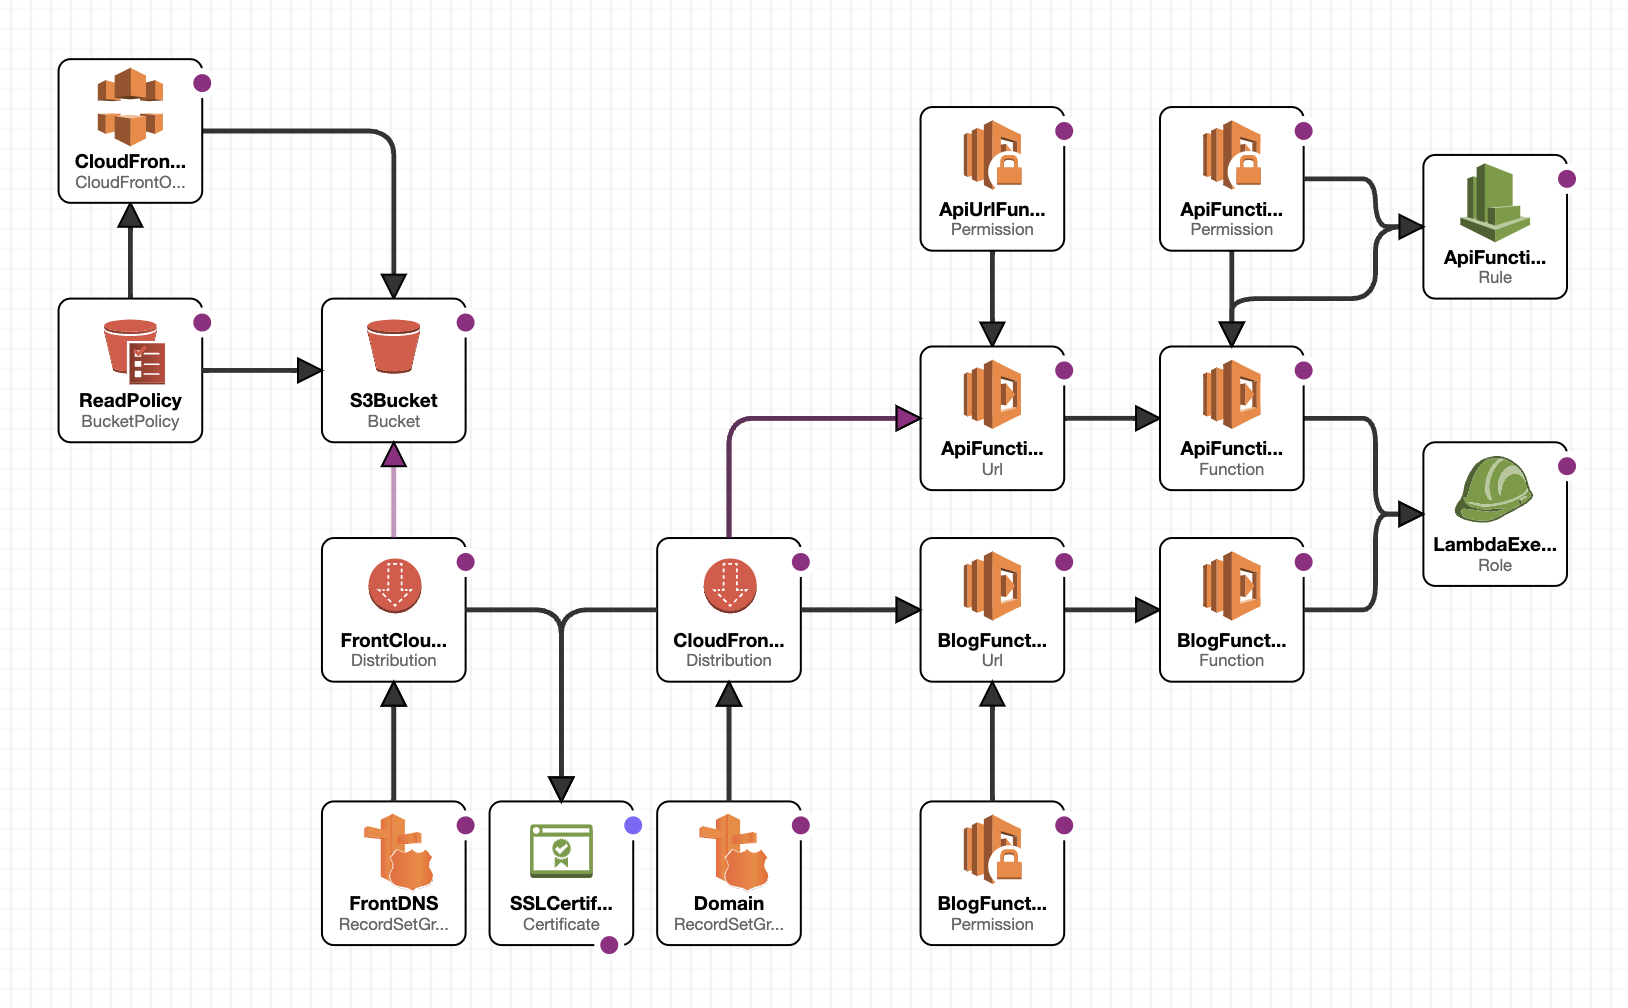
After the github action completes, if everything was configured properly, you will have your own stack deployed that looks like this:
You can test it out by going to the
https://web-$STACK_NAME.$DOMAINorhttps://api-$STACK_NAME.$DOMAINurls in your browser.
First run can sometimes take a while because of the certificate validation step. Also If anything goes wrong during the first deploy just delete the Cloudfromation stack from the AWS console and run the github action again. Later failed deployments should properly rollback to a working version if they happen, but the first deploy failing is a special case and might put the stack in a bad state.
In the next sections I’ll go in depth through the individual resources in the stack.
Server
First let us create the two lambda functions that will serve as our servers. They also need a lambda execution role that is empty at this point, but in the future we would expand this role with other policies if we need the lambdas to access other AWS services or resources.
CodeUri parameter is the local path to the folder containing the code of the specific function.
  LambdaExecutionRole:
    Type: AWS::IAM::Role
    Properties:
      AssumeRolePolicyDocument:
        Version: '2012-10-17'
        Statement:
          Effect: Allow
          Principal:
            Service: lambda.amazonaws.com
          Action: sts:AssumeRole

  BlogsFunction:
    Type: AWS::Serverless::Function
    Properties:
      CodeUri: ./blogs
      Handler: dist/lambda.handler
      MemorySize: 1024
      Role: !GetAtt LambdaExecutionRole.Arn
      Runtime: nodejs18.x
      Timeout: 30

  ApiFunction:
    Type: AWS::Serverless::Function
    Properties:
      CodeUri: ./api
      Handler: dist/lambda.handler
      MemorySize: 1024
      Role: !GetAtt LambdaExecutionRole.Arn
      Runtime: nodejs18.x
      Timeout: 30
To be able to call upon these functions via regular HTTP from outside of our AWS account we will add unauthorized Lambda Function URLs with the needed permissions:
  ApiFunctionURL:
    Type: AWS::Lambda::Url
    Properties:
      AuthType: NONE
      TargetFunctionArn: !Ref ApiFunction

  ApiUrlFunctionPermissions:
    Type: AWS::Lambda::Permission
    Properties:
      FunctionName: !Ref ApiFunctionURL
      Action: lambda:InvokeFunctionUrl
      Principal: "*"
      FunctionUrlAuthType: NONE

  BlogsFunctionURL:
    Type: AWS::Lambda::Url
    Properties:
      AuthType: NONE
      TargetFunctionArn: !Ref BlogsFunction

  BlogFunctionPermissions:
    Type: AWS::Lambda::Permission
    Properties:
      FunctionName: !Ref BlogFunctionURL
      Action: lambda:InvokeFunctionUrl
      Principal: "*"
      FunctionUrlAuthType: NONE
Now we could end here but this results in a pair of randomly generated immutable URLs, which is something we don’t want in our production code. We’ll next put the function URLs behind a Cloudfront distribution in order to get some more flexibility within our stack and to help with the future maintainability of the system.
Cloudfront also gives us some cool stuff as an extra. Such as:
- Ability to attach WAF to help with security and spam prevention
- Cloudfront headers for easier user handling and content personalization
- Logging and monitoring at the networking layer
- etc
I also added a Route53 DNS alias to the distribution in a later step, this isn’t necessary as Cloudfront covers most of our routing needs, but it gives us a readable and easier to remember URL. Also using URLs from our own domain makes our system less dependant on Cloudfront and AWS in general, making any future changes to the architecture easier.
  CloudFrontDistribution:
    DependsOn:
      - ApiFunctionURL
      - BlogFunctionURL
    Type: "AWS::CloudFront::Distribution"
    Properties:
      DistributionConfig:
        Aliases:
          - !Join ['', [ "api-", !Ref AWS::StackName, ".", !Ref DOMAIN]]
        ViewerCertificate:
          AcmCertificateArn: !Ref SSLCertificate
          MinimumProtocolVersion: TLSv1.2_2019
          SslSupportMethod: sni-only
        DefaultCacheBehavior:
          CachePolicyId: 4135ea2d-6df8-44a3-9df3-4b5a84be39ad
          TargetOriginId: ApiFunction
          ViewerProtocolPolicy: "redirect-to-https"
          OriginRequestPolicyId: b689b0a8-53d0-40ab-baf2-68738e2966ac
          AllowedMethods: [ 'GET', 'HEAD', 'OPTIONS', 'PUT', 'PATCH', 'POST', 'DELETE' ]
        CacheBehaviors:
          - AllowedMethods: [ DELETE, GET, HEAD, OPTIONS, PATCH, POST, PUT ]
            TargetOriginId: BlogFunction
            PathPattern: /blogs
            ViewerProtocolPolicy: redirect-to-https
            CachePolicyId: 4135ea2d-6df8-44a3-9df3-4b5a84be39ad
            OriginRequestPolicyId: b689b0a8-53d0-40ab-baf2-68738e2966ac
        Enabled: true
        HttpVersion: http2
        Origins:
          - Id: ApiFunction
            DomainName: !Select [2, !Split ["/", !GetAtt ApiFunctionURL.FunctionUrl]]
            CustomOriginConfig:
              HTTPSPort: 443
              OriginProtocolPolicy: https-only
          - Id: BlogFunction
            DomainName: !Select [2, !Split ["/", !GetAtt BlogFunctionURL.FunctionUrl]]
            CustomOriginConfig:
              HTTPSPort: 443
              OriginProtocolPolicy: https-only
        PriceClass: "PriceClass_All"
CachePolicyId and OriginRequestPolicyId values are of public policies that can be used on any AWS account.
Frontend
Frontend will be hosted on a S3 bucket behind a different Cloudfront distribution. In this snippet we create the necessary security policies to only allow access to the s3 files through the cloudfront. This isn’t all that important for now, but in the future you might want to add some additional cloudfront stuff and anyway using S3 urls in production is frowned upon.
  S3Bucket:
    Type: "AWS::S3::Bucket"
    Properties:
      BucketName: !Sub "domain-${Name}-${Branch}"
      WebsiteConfiguration:
        ErrorDocument: "index.html"
        IndexDocument: "index.html"

  ReadPolicy:
    Type: "AWS::S3::BucketPolicy"
    Properties:
      Bucket: !Ref S3Bucket
      PolicyDocument:
        Statement:
          - Action: "s3:GetObject"
            Effect: Allow
            Resource: !Sub "arn:aws:s3:::${S3Bucket}/*"
            Principal:
              CanonicalUser: !GetAtt CloudFrontOriginAccessIdentity.S3CanonicalUserId

  CloudFrontOriginAccessIdentity:
    Type: "AWS::CloudFront::CloudFrontOriginAccessIdentity"
    Properties:
      CloudFrontOriginAccessIdentityConfig:
        Comment: !Ref S3Bucket

  FrontCloudFront:
    DependsOn:
      - S3Bucket
      - SSLCertificate
    Type: "AWS::CloudFront::Distribution"
    Properties:
      DistributionConfig:
        Aliases:
          - !Join ['', [ "web-", !Ref AWS::StackName, ".", !Ref DOMAIN]]
        ViewerCertificate:
          AcmCertificateArn: !Ref SSLCertificate
          MinimumProtocolVersion: TLSv1.2_2019
          SslSupportMethod: sni-only
        CustomErrorResponses:
          - ErrorCode: 403 # not found
            ResponseCode: 200
            ErrorCachingMinTTL: 10
            ResponsePagePath: "/index.html"
          - ErrorCode: 404 # not found
            ResponseCode: 200
            ErrorCachingMinTTL: 10
            ResponsePagePath: "/index.html"
        DefaultCacheBehavior:
          CachePolicyId: 4135ea2d-6df8-44a3-9df3-4b5a84be39ad
          TargetOriginId: s3origin
          ViewerProtocolPolicy: "redirect-to-https"
        # This DefaultRootObject configuration is not enough.
        # DefaultRootObject: "/index.html"
        Enabled: true
        HttpVersion: http2
        Origins:
          - DomainName:  !Join ['', [ "web-", !Ref AWS::StackName, "-", !Ref AWS::AccountId, ".s3.", !Ref AWS::Region, ".amazonaws.com" ]]
            Id: s3origin
            S3OriginConfig:
              OriginAccessIdentity: !Sub "origin-access-identity/cloudfront/${CloudFrontOriginAccessIdentity}"
        PriceClass: "PriceClass_All"
Domain
Now we will put everything behind a single domain with separate subdomains for the frontend and the API to make it cleaner and more production-ready. This way the cloudformation stack is completely self-contained except for the purchase of the domain that has to be done manually before first deployment
The two separate subdomains, api-$STACK_NAME.$DOMAIN and web-$STACK_NAME.$DOMAIN are defined as two route53 records and a ssl record for *.$DOMAIN is created
  BackendDNS:
    DependsOn:
      - CloudFrontDistribution
    Type: "AWS::Route53::RecordSetGroup"
    Properties:
      HostedZoneId: !Ref HOSTEDZONE
      RecordSets:
        - Name: !Join ['', [ "api-", !Ref AWS::StackName, ".", !Ref DOMAIN]]
          Type: A
          AliasTarget:
            HostedZoneId: Z2FDTNDATAQYW2 # global Cloudfront hosted zone
            DNSName: !GetAtt
              - CloudFrontDistribution
              - DomainName
  FrontDNS:
    DependsOn:
      - FrontCloudFront
    Type: "AWS::Route53::RecordSetGroup"
    Properties:
      HostedZoneId: !Ref HOSTEDZONE
      RecordSets:
        - Name: !Join ['', [ "web-", !Ref AWS::StackName, ".", !Ref DOMAIN]]
          Type: A
          AliasTarget:
            HostedZoneId: Z2FDTNDATAQYW2
            DNSName: !GetAtt
              - FrontCloudFront
              - DomainName

  SSLCertificate:
    Type: "AWS::CertificateManager::Certificate"
    Properties:
      DomainName: !Join ['', [ "*.", !Ref DOMAIN]]
      ValidationMethod: DNS
The hosted zone Z249BWKE7HL1UY is the hosted zone for all cloudfront distributions.
Deploy procedure
Now with the template file finished we can start with the deployment procedure. I’ll break down the deploy script:
First we retrieve the AWS account id and the desired hosted zone id. We could have made the hosted zone an environment variable like the domain, but I feel this makes it more flexible and easier to use.
ACCOUNT=`aws sts get-caller-identity --query "Account" --output text`
HOSTED_ZONE=`aws route53 list-hosted-zones-by-name --dns-name $DOMAIN --query "HostedZones[0].Id" --output text`
Next we crete an S3 bucket that will hold the temporary files needed during the deployment:
BUCKET=deploy-bucket-$ACCOUNT
aws s3api create-bucket --bucket $BUCKET  --region $AWS_REGION
If the bucket already exists the command will do nothing, so don’t worry about calling this multiple times.
Now we can call the cloudformation package command which will handle all of the yaml file transformations we used. In this case this mostly means the server code that needs to be uploaded to S3 for the deploy to Lambda.
aws cloudformation package --template-file ./cf.yml --s3-bucket $BUCKET --output-template-file packaged-sam.yaml
Now you can run the deploy command on this packaged-sam.yaml file while also passing through the parameters we already defined in the original template, domain and hosted zone.
aws cloudformation deploy --template-file packaged-sam.yaml --stack-name $STACK_NAME --capabilities CAPABILITY_NAMED_IAM CAPABILITY_IAM CAPABILITY_AUTO_EXPAND --parameter-override DOMAIN=$DOMAIN HOSTEDZONE=$HOSTED_ZONE --s3-bucket $BUCKET
And finally we upload the frontend code, as the cloudformation doesn’t have definitions for the contents of a S3 bucket out of the box.
aws s3 sync ./web s3://web-$STACK_NAME-$ACCOUNT/
Cost breakdown
S3: Negligible, storage costs 2 cents per GB monthly and data transfer costs are offloaded to Cloudfront
Cloudfront: First 1TB of bandwidth or the first 10,000,000 requests per month free
Lambda: First 1 million requests per month are free, afterwards $16.7 for 1 million second-long requests using 1GB of memory. Now, memory amount can be configured, and duration of the request depends on your server optimization and use, so it can go as low or lower than $1.67 for a more realistic million 200ms-long requests using 512MB of memory.
Next steps
In future posts I’ll expand the stack definition with more features to make it safer
- Add automated rollback during deployment
- a reasonable WAF setup
- lambda scalability optimization
- Migration to CDK
- etc…